【断酒iOSアプリ制作】飲酒量の視覚化 プログレスバーを作る (5日目)
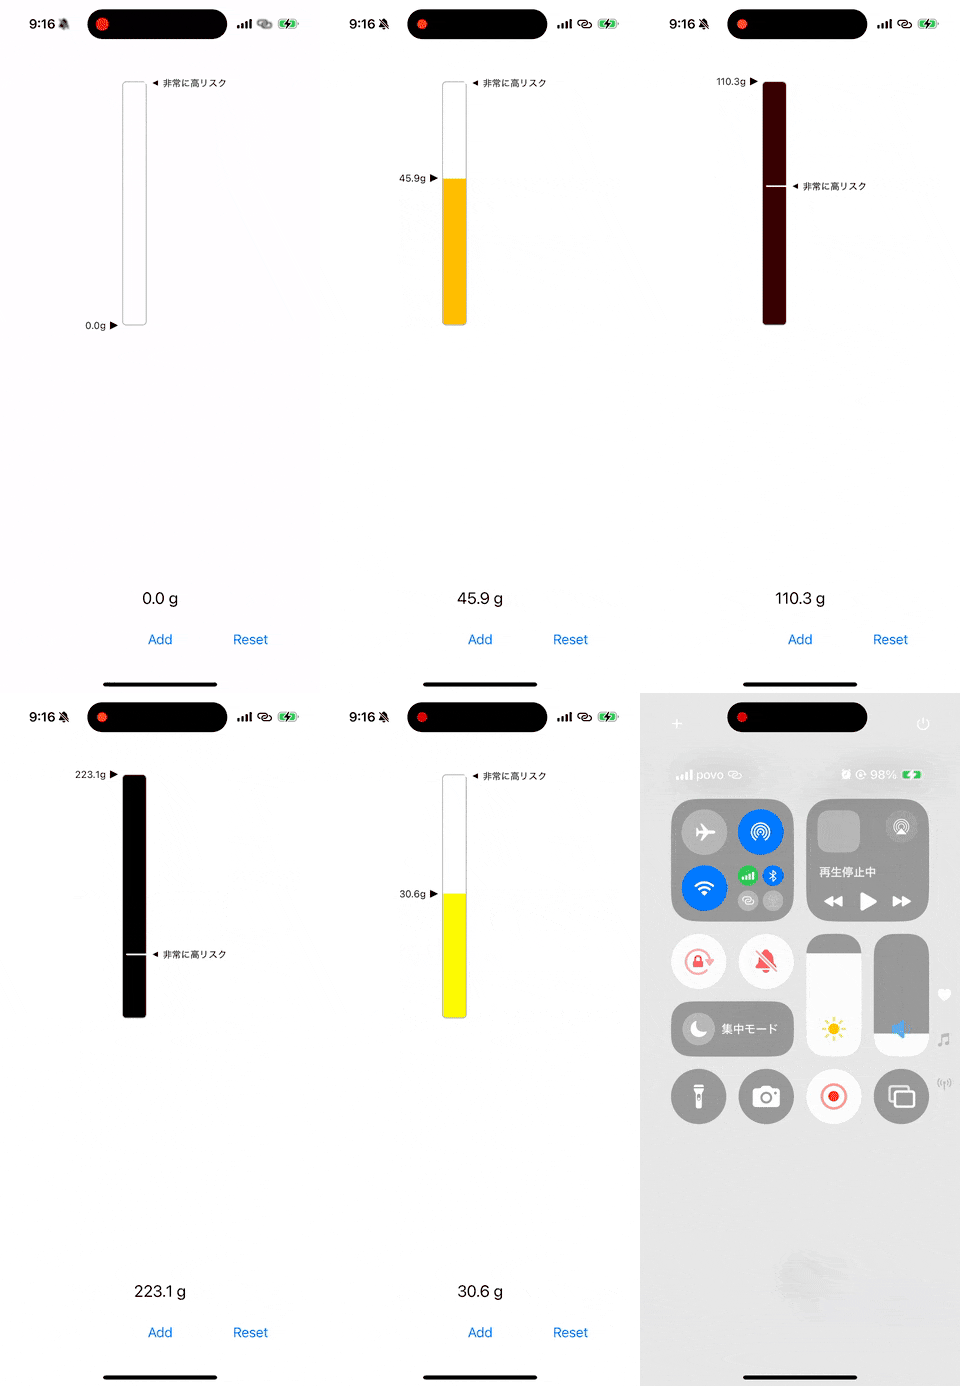
断酒アプリ制作5日目の本日は、純アルコール量を計算し、飲酒量に応じた色の変化やリスクレベルをわかりやすく表示する「縦型プログレスバー」を作成します。これにより、数値で飲酒量を認識するよりも、ユーザーは自身の飲酒状況を一目で把握できるため、飲み過ぎかどうかの判断がつきやすくなります。
下の動画のような縦型プログレスバーを作ることがゴールになります。
純アルコール量の計算と視覚化
アプリケーションで飲酒量を視覚化するために、純アルコール量を計算し、その危険度をユーザーに示すインターフェースを構築します。本記事では、VerticalProgressBar クラスを作成し、飲酒量を視覚的に表示する方法を解説します。
純アルコール量の計算
純アルコール量を以下の式で計算します。
$$ 純アルコール量 (g) = 飲酒量 (ml) \times アルコール度数 (\%) \times 0.8 $$この値に基づき、飲酒リスクを段階的に分類し、視覚化することで、飲酒量を直感的に理解できるようにします。
危険度の分類
ちなみに純アルコール量に基づく危険度は、以下のように段階的に分類されます。
| 純アルコール量 (g/日) | 危険度の段階 | 健康への影響 |
|---|---|---|
| 0~19g | 低リスク | 健康影響は少ないが、習慣化に注意が必要。 |
| 20~39g | 中リスク | 肝臓疾患や高血圧のリスクがわずかに増加。 |
| 40~59g | 高リスク | アルコール依存症や肝臓疾患のリスク増加。 |
| 60g以上 | 非常に高リスク | アルコール依存症、肝硬変、心血管疾患の危険大。 |
※ 基準は一般的なものです。国や医療機関によって異なる場合があります
注意
- 週単位での評価: 世界保健機関(WHO)や各国のガイドラインでは、週単位での飲酒量の指針を設けています。
- 例: 日本では「男性で1日あたり純アルコール量40g以下、女性で20g以下」が目安とされています。
- 連続飲酒の回避: 少なくとも週2日は休肝日を設けることが推奨されています。
- 個人差: 体重、性別、年齢、体質により影響が異なります。
プログレスバーの実装
VerticalProgressBar クラス
VerticalProgressBar は飲酒量に応じた進捗を縦型プログレスバーで表示するカスタムビューです。
import UIKit

class VerticalProgressBar: UIView {

    private let containerView = UIView() // 背景コンテナ
    private let progressBar = UIView() // プログレスバー
    private let arrowView = UIView() // 三角形の矢印を表示するビュー
    private let currentArrowView = UIView() // 現在の状態を示す矢印
    var maxAlcoholContent: Double = 60.0 // 最大値を設定
    var maxAlcoholContentTitle: String = "非常に高リスク" // 最大値のタイトル

    private var internalProgress: Double = 0.0 // プログレスバーの進捗状況

    var progress: Double {
        get {
            internalProgress
        }
        set {
            internalProgress = newValue
            updateProgress()
        }
    }

    override init(frame: CGRect) {
        super.init(frame: frame)
        setupViews()
    }

    required init?(coder: NSCoder) {
        super.init(coder: coder)
        setupViews()
    }

    private func setupViews() {
        // 背景コンテナ
        containerView.layer.borderWidth = 1
        containerView.layer.borderColor = UIColor.lightGray.cgColor
        containerView.clipsToBounds = true
        containerView.layer.cornerRadius = 5 // 背景のみ角丸にする
        addSubview(containerView)

        // プログレスバー
        progressBar.backgroundColor = .green
        containerView.addSubview(progressBar)

        // 最大値を示す矢印を作成
        arrowView.backgroundColor = .clear
        addSubview(arrowView)

        // 現在の状態を示す矢印を作成
        currentArrowView.backgroundColor = .clear
        addSubview(currentArrowView)

    }

    // レイアウトの更新
    override func layoutSubviews() {
        super.layoutSubviews()
        containerView.frame = bounds
        updateProgress()
    }

    // プログレスバーの更新
    private func updateProgress() {
        let containerHeight = containerView.bounds.height

        // プログレスバーの高さを計算
        let progressHeight = CGFloat(min(internalProgress / maxAlcoholContent, 1.0)) * containerHeight

        // アニメーションでプログレスバーの増加をスムーズに
        UIView.animate(withDuration: 0.3, animations: {
            self.progressBar.frame = CGRect(
                x: 0,
                y: containerHeight - progressHeight,
                width: self.containerView.bounds.width,
                height: progressHeight
            )
        })

        // 矢印の位置を更新
        let arrowPosition: CGFloat
        if internalProgress > maxAlcoholContent {
            arrowPosition = CGFloat((maxAlcoholContent / internalProgress) * containerHeight)
        } else {
            arrowPosition = CGFloat(containerHeight)
        }

        updateArrow(position: arrowPosition)
        updateCurrentArrow(position: containerHeight - progressHeight)

        // 色のアニメーションを追加
        animateColorChange(for: progressBar, to: calculateColor(for: internalProgress))
    }

    // 色のアニメーション
    private func animateColorChange(for view: UIView, to color: UIColor) {
        UIView.transition(with: view, duration: 0.3, options: [.transitionCrossDissolve], animations: {
            view.backgroundColor = color
        })
    }

    // 進捗に応じた色を計算
    private func calculateColor(for progress: Double) -> UIColor {
        // 色の範囲(緑→黄色→赤→黒)
        let green = UIColor.green
        let yellow = UIColor.yellow
        let red = UIColor.red
        let black = UIColor.black

        if progress <= maxAlcoholContent {
            // 緑→黄色→赤の間
            let normalizedProgress = progress / maxAlcoholContent
            if normalizedProgress < 0.5 {
                return interpolateColor(from: green, to: yellow, fraction: CGFloat(normalizedProgress * 2.0))
            } else {
                return interpolateColor(from: yellow, to: red, fraction: CGFloat((normalizedProgress - 0.5) * 2.0))
            }
        } else {
            // 赤→黒の間
            let overLimitProgress = (progress - maxAlcoholContent) / maxAlcoholContent
            return interpolateColor(from: red, to: black, fraction: CGFloat(min(overLimitProgress, 1.0)))
        }
    }

    // 色の補間
    private func interpolateColor(from: UIColor, to: UIColor, fraction: CGFloat) -> UIColor {
        // UIColorのコンポーネントを取得
        var fromRed: CGFloat = 0, fromGreen: CGFloat = 0, fromBlue: CGFloat = 0, fromAlpha: CGFloat = 0
        var toRed: CGFloat = 0, toGreen: CGFloat = 0, toBlue: CGFloat = 0, toAlpha: CGFloat = 0

        from.getRed(&fromRed, green: &fromGreen, blue: &fromBlue, alpha: &fromAlpha)
        to.getRed(&toRed, green: &toGreen, blue: &toBlue, alpha: &toAlpha)

        // 線形補間で色を計算
        let red = fromRed + (toRed - fromRed) * fraction
        let green = fromGreen + (toGreen - fromGreen) * fraction
        let blue = fromBlue + (toBlue - fromBlue) * fraction
        let alpha = fromAlpha + (toAlpha - fromAlpha) * fraction

        return UIColor(red: red, green: green, blue: blue, alpha: alpha)
    }

    // 矢印の位置を更新
    private func updateArrow(position: CGFloat) {

        let arrowWidth: CGFloat = 10
        let arrowHeight: CGFloat = 10
        let horizontalBarWidth: CGFloat = containerView.bounds.width // 水平棒の幅

        // 三角形と水平棒を一つのパスで描画
        let path = UIBezierPath()

        // 三角形の描画(右側)
        path.move(to: CGPoint(x: arrowWidth, y: 0))
        path.addLine(to: CGPoint(x: 0, y: arrowHeight / 2))
        path.addLine(to: CGPoint(x: arrowWidth, y: arrowHeight))
        path.close()

        // 水平棒の描画
        path.move(to: CGPoint(x: -horizontalBarWidth, y: arrowHeight / 2)) // 棒の始点
        path.addLine(to: CGPoint(x: 0, y: arrowHeight / 2)) // 棒の終点

        let shapeLayer = CAShapeLayer()
        shapeLayer.path = path.cgPath
        shapeLayer.fillColor = UIColor.black.cgColor
        shapeLayer.strokeColor = UIColor.white.cgColor // 水平棒の色
        shapeLayer.lineWidth = 2.0 // 水平棒の太さ

        arrowView.layer.sublayers?.forEach { $0.removeFromSuperlayer() } // 既存の三角形を削除
        arrowView.layer.addSublayer(shapeLayer)

        // アニメーションで矢印の移動をスムーズに
        UIView.animate(withDuration: 0.3, animations: {
            self.arrowView.frame = CGRect(
                x: self.containerView.frame.maxX + 5,
                y: self.bounds.height - position - (arrowHeight / 2) + 2,
                width: arrowWidth,
                height: arrowHeight
            )
        })

        // ラベルを追加または更新
        if let label = viewWithTag(9001) as? UILabel {
            UIView.animate(withDuration: 0.3, animations: {
                label.frame = CGRect(
                    x: self.arrowView.frame.maxX + 5,
                    y: self.arrowView.frame.midY - 10,
                    width: 80,
                    height: 20
                )
            })
        } else {
            let label = UILabel()
            label.text = maxAlcoholContentTitle
            label.font = UIFont.systemFont(ofSize: 12)
            label.textColor = .black
            label.tag = 9001 // ラベルをタグで管理
            label.frame = CGRect(
                x: arrowView.frame.maxX + 5,
                y: arrowView.frame.midY - 10,
                width: 80,
                height: 20
            )
            addSubview(label)
        }
    }


    // 現在の状態を示す矢印の位置を更新
    private func updateCurrentArrow(position: CGFloat) {
        let arrowWidth: CGFloat = 10
        let arrowHeight: CGFloat = 10

        // 矢印を三角形に描画(現在の状態を示す矢印)
        let path = UIBezierPath()
        path.move(to: CGPoint(x: 0, y: 0))
        path.addLine(to: CGPoint(x: arrowWidth, y: arrowHeight / 2))
        path.addLine(to: CGPoint(x: 0, y: arrowHeight))
        path.close()

        let shapeLayer = CAShapeLayer()
        shapeLayer.path = path.cgPath
        shapeLayer.fillColor = UIColor.black.cgColor

        currentArrowView.layer.sublayers?.forEach { $0.removeFromSuperlayer() } // 既存の三角形を削除
        currentArrowView.layer.addSublayer(shapeLayer)

        // アニメーションで矢印の移動をスムーズに
        UIView.animate(withDuration: 0.3, animations: {
            self.currentArrowView.frame = CGRect(
                x: self.containerView.frame.minX - 15,
                y: position - 5,
                width: arrowWidth,
                height: arrowHeight
            )
        })

        // ラベルを追加または更新
        if let label = viewWithTag(9002) as? UILabel {
            // ラベルの値を更新
            label.text = String(format: "%.1fg", internalProgress)
            UIView.animate(withDuration: 0.3, animations: {
                label.frame = CGRect(
                    x: self.currentArrowView.frame.minX - 55, // 三角形の左側に配置
                    y: self.currentArrowView.frame.midY - 10,
                    width: 50,
                    height: 20
                )
            })
        } else {
            let label = UILabel()
            label.text = String(format: "%.1fg", internalProgress)
            label.font = UIFont.systemFont(ofSize: 12)
            label.textColor = .black
            label.textAlignment = .right
            label.tag = 9002 // ラベルをタグで管理
            label.frame = CGRect(
                x: currentArrowView.frame.minX - 55, // 三角形の左側に配置
                y: currentArrowView.frame.midY - 10,
                width: 50,
                height: 20
            )
            addSubview(label)
        }
    }

    // 水平線を描画
    private func drawHorizontalLine(at yPosition: CGFloat) {
        // 既存の水平線を削除
        containerView.layer.sublayers?.removeAll(where: { $0.name == "HorizontalLine" })

        // 水平線を描画
        let linePath = UIBezierPath()
        linePath.move(to: CGPoint(x: 0, y: yPosition))
        linePath.addLine(to: CGPoint(x: containerView.bounds.width, y: yPosition))

        let lineLayer = CAShapeLayer()
        lineLayer.path = linePath.cgPath
        lineLayer.strokeColor = UIColor.white.cgColor // 水平線を白色に設定
        lineLayer.lineWidth = 2.0 // 線の太さを調整
        lineLayer.shadowColor = UIColor.black.cgColor // 影を追加して視認性を向上
        lineLayer.shadowOpacity = 0.8
        lineLayer.shadowRadius = 1
        lineLayer.shadowOffset = CGSize(width: 0, height: 1)
        lineLayer.name = "HorizontalLine" // 識別のため名前を付ける

        containerView.layer.addSublayer(lineLayer)
    }

    // リセット機能
    func reset() {
        internalProgress = 0.0
        updateProgress()

        // ラベルを削除
        if let label = viewWithTag(9001) as? UILabel {
            label.removeFromSuperview()
        }
    }
}
主なプロパティと機能
- progress: 現在の純アルコール量を設定します。
- maxAlcoholContent: プログレスバーの最大値(例:60g)。
- updateProgress(): プログレスバーを更新し、進捗に応じた色や矢印を表示します。
カラーの変化
calculateColor(for:) メソッドでは、飲酒量に応じて以下のように色を変化させます:
- 緑 → 黄色 → 赤:低リスクから高リスクへ。
- 赤 → 黒:高リスクを超えた場合。
現在の飲酒量とリスクレベルの表示
updateArrow(position:) と updateCurrentArrow(position:) メソッドで、現在のリスクレベルや飲酒量を矢印とラベルで表示します。
コードの使い方
プログレスバーの配置
VerticalProgressBar を画面に追加し、飲酒量をリアルタイムで更新します。
import UIKit

class ViewController: UIViewController {

    @IBOutlet weak var totalLabel: UILabel!

    private var totalPureAlcoholContent: Double = 0.0
    private let progressBar = VerticalProgressBar()

    override func viewDidLoad() {
        super.viewDidLoad()

        // プログレスバーをプログラムで追加
        progressBar.frame = CGRect(x: 150, y: 100, width: 30, height: 300)
        progressBar.maxAlcoholContent = 60.0 // 最大値を設定
        view.addSubview(progressBar)

        ...
}
ボタンによる進捗の更新
ボタンを押すたびにランダムなアルコール量を追加し、プログレスバーとラベルを更新します。
@IBAction func onTappedClick(_ sender: Any) {
    let randomAlcohol = Double.random(in: 2.0...10.0)
    totalPureAlcoholContent += randomAlcohol

    progressBar.progress = totalPureAlcoholContent
    totalLabel.text = String(format: "%.1f g", totalPureAlcoholContent)
}
リセット機能
飲酒量とプログレスバーをリセットします。
@IBAction func onTappedReset(_ sender: UIButton) {
    totalPureAlcoholContent = 0.0
    progressBar.reset()
    totalLabel.text = String(format: "%.1f g", totalPureAlcoholContent)
}
サンプルアプリ
GitHubリポジトリでサンプルコードを公開しています:
リポジトリ内の AlcoholMeterSampleApp ターゲットをビルドすると動作を確認できます。
まとめ
純アルコール量を計算し、飲酒量を視覚的に表示することでユーザーに危険度を知らせる仕組みを構築。
- VerticalProgressBar を使い、リアルタイムのデータ反映が可能。
- 飲酒量とリスクを色や矢印で直感的に伝えるUIを実現。
この記事を参考に、あなた自身のアプリ開発にも取り入れてみてください。


