【断酒iOSアプリ制作】カレンダーを表示する (1日目)
このブログ記事では、断酒に挑戦するために「断酒カレンダーアプリ」をSwiftで制作する方法を紹介します。記事の内容は、カレンダーのUI表示や横スクロールの実装を丁寧に解説し、制作過程を共有することで、同じようなアプリを作りたい方々の参考にしてもらえればと思います。
はじめに
私ごとですが、1〜2年ほど前から断酒したいなと思い始めて、何度も挑戦しては挫折を繰り返している今日この頃です。 毎日のようにお酒を呑んでいましたが、年齢とともに(2024年現在で43歳)、もうそろそろお酒はいいかなと思い始めてきました。 時代的にも、断酒ブームですよね。若い人たちは飲まないし、WHOは次はお酒を厳しくしていく感じですし。
「酒ログ」というアプリで飲酒記録をつけていたのですが、断酒なかなか継続が難しいのが現状です。それでもまた断酒に挑戦しようと思いまして、今ままでお酒を呑んでいた時間を使って、せっかくなので断酒のカレンダーアプリを作ってみようと決意しました。お酒を我慢しようと思うと断酒は続かないので、何か熱中できることに集中すれば、お酒を飲むことを忘れるので断酒もうまくいくと思います。
さらにせっかくなので、ブログ記事で制作の一部を公開しようと考えました。 今回はカレンダー表示のUI部分の作り方をご紹介いたします。
この記事のゴール
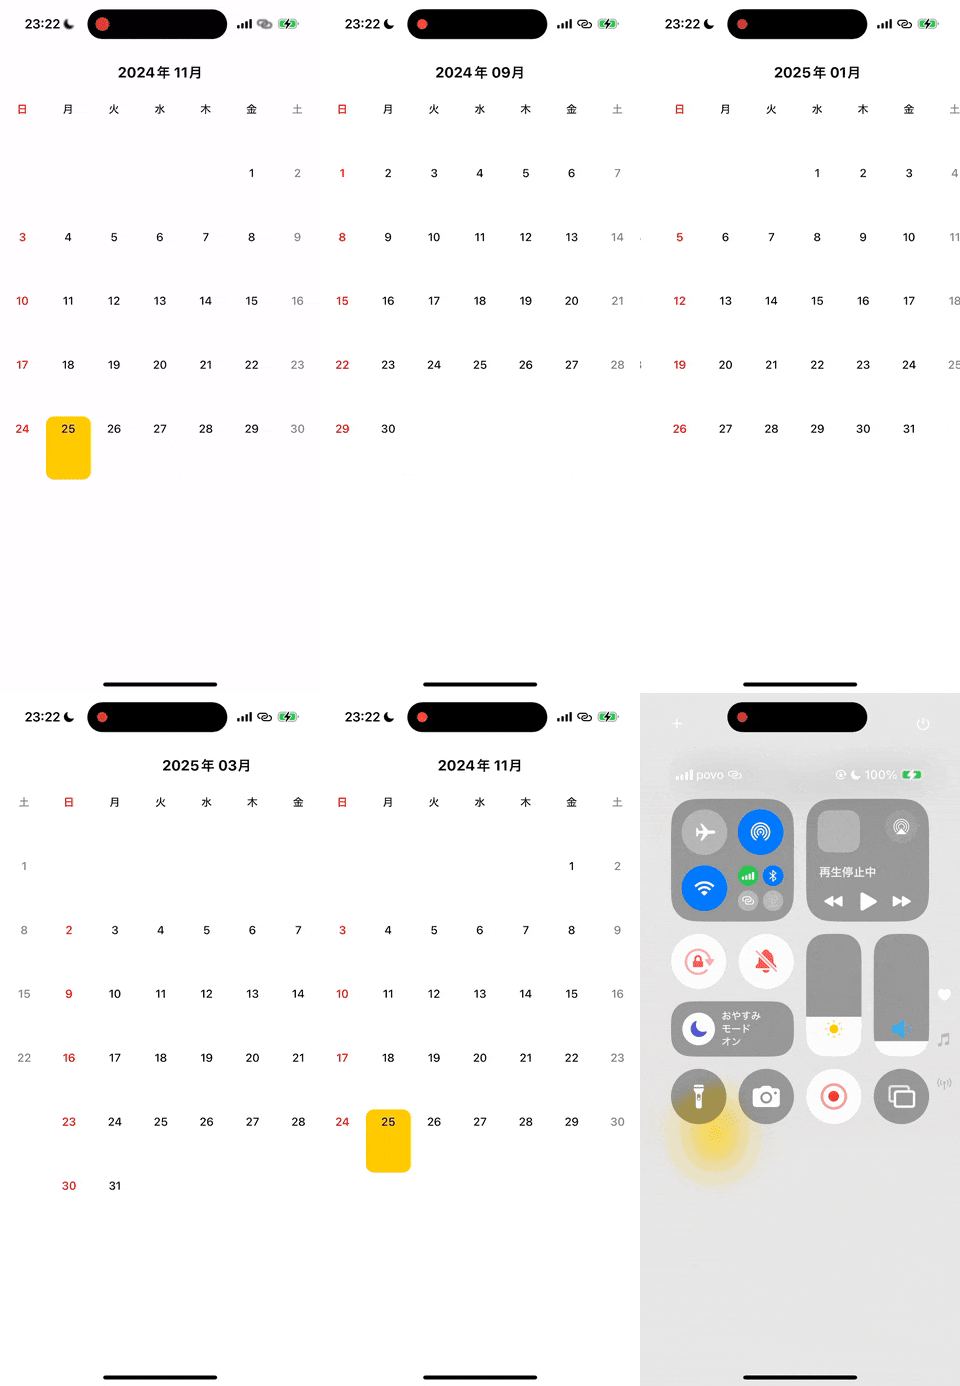
今回の目標は、以下の動画のようにカレンダーを横スクロールで前月や次月に切り替えられるUIを作成することです。 カレンダーは日付と曜日を表示し、現在の日付をハイライトします。さらに、月の切り替えがスムーズに行える仕組みを構築します。
カレンダー表示の基本的な構築
UICollectionViewでカレンダーを作成
UICollectionViewを使い、カレンダーのセルを日付で表現します。以下のコードはカレンダーを管理するCalendarMonthViewControllerです。
import UIKit

class CalendarMonthViewController: UIViewController {
    private var collectionView: UICollectionView!
    private var days: [String] = []
    private let weekdays = ["日", "月", "火", "水", "木", "金", "土"]
    private let calendar = Calendar.current
    var currentMonth: Date = Date()

    private let monthLabel: UILabel = { // 西暦と月を表示するラベル
        let label = UILabel()
        label.translatesAutoresizingMaskIntoConstraints = false
        label.textAlignment = .center
        label.font = UIFont.systemFont(ofSize: 18, weight: .bold)
        label.textColor = .black
        return label
    }()

    override func viewDidLoad() {
        super.viewDidLoad()
        setupUI()
        setupDays()
        updateMonthLabel()
    }

    func setMonth(date: Date) {
        self.currentMonth = date
    }

    private func setupUI() {
        // 月ラベルの設定
        view.addSubview(monthLabel)
        view.backgroundColor = .white

        NSLayoutConstraint.activate([
            monthLabel.topAnchor.constraint(equalTo: view.safeAreaLayoutGuide.topAnchor, constant: 10),
            monthLabel.leadingAnchor.constraint(equalTo: view.leadingAnchor),
            monthLabel.trailingAnchor.constraint(equalTo: view.trailingAnchor),
            monthLabel.heightAnchor.constraint(equalToConstant: 40)
        ])
        // カレンダー部分のレイアウト
        let layout = UICollectionViewFlowLayout()
        layout.minimumLineSpacing = 1
        layout.minimumInteritemSpacing = 1
        layout.itemSize = CGSize(width: view.bounds.width / 7 - 1, height: view.bounds.width / 5 - 1)

        collectionView = UICollectionView(frame: .zero, collectionViewLayout: layout)
        collectionView.translatesAutoresizingMaskIntoConstraints = false
        collectionView.backgroundColor = .white
        collectionView.register(CustomCalendarCell.self, forCellWithReuseIdentifier: CustomCalendarCell.identifier)
        collectionView.dataSource = self
        collectionView.delegate = self

        view.addSubview(collectionView)

        NSLayoutConstraint.activate([
            collectionView.topAnchor.constraint(equalTo: monthLabel.bottomAnchor, constant: 10),
            collectionView.leadingAnchor.constraint(equalTo: view.leadingAnchor),
            collectionView.trailingAnchor.constraint(equalTo: view.trailingAnchor),
            collectionView.bottomAnchor.constraint(equalTo: view.bottomAnchor)
        ])
    }

    private func setupDays() {
        let components = calendar.dateComponents([.year, .month], from: currentMonth)
        guard let startOfMonth = calendar.date(from: components) else { return }

        // 1日が始まる曜日
        let weekday = calendar.component(.weekday, from: startOfMonth)
        let daysInMonth = calendar.range(of: .day, in: .month, for: currentMonth)?.count ?? 0

        days = weekdays
        days.append(contentsOf: Array(repeating: "", count: weekday - 1))
        days.append(contentsOf: (1...daysInMonth).map { String($0) })

        collectionView.reloadData()
    }

    private func updateMonthLabel() {
        let formatter = DateFormatter()
        formatter.dateFormat = "yyyy年 MM月"
        monthLabel.text = formatter.string(from: currentMonth)
    }
}

extension CalendarMonthViewController: UICollectionViewDataSource {
    func collectionView(_ collectionView: UICollectionView, numberOfItemsInSection section: Int) -> Int {
        return days.count
    }

    func collectionView(_ collectionView: UICollectionView, cellForItemAt indexPath: IndexPath) -> UICollectionViewCell {
        guard let cell = collectionView.dequeueReusableCell(withReuseIdentifier: CustomCalendarCell.identifier, for: indexPath) as? CustomCalendarCell else {
            return UICollectionViewCell()
        }

        let day = days[indexPath.item]
        let isToday = isToday(dateString: day)
        let column = indexPath.item % 7 // 曜日を判定(0: 日曜日, 6: 土曜日)

        var textColor: UIColor = .black
        if column == 0 { // 日曜日
            textColor = .red
        } else if column == 6 { // 土曜日
            textColor = .gray
        }

        cell.configure(day: day, isToday: isToday, textColor: textColor)
        return cell
    }

    private func isToday(dateString: String) -> Bool {
        guard let day = Int(dateString) else { return false }

        let todayComponents = calendar.dateComponents([.year, .month, .day], from: Date())
        let currentComponents = calendar.dateComponents([.year, .month], from: currentMonth)

        return todayComponents.year == currentComponents.year &&
               todayComponents.month == currentComponents.month &&
               todayComponents.day == day
    }
}

extension CalendarMonthViewController: UICollectionViewDelegate {
    func collectionView(_ collectionView: UICollectionView, didSelectItemAt indexPath: IndexPath) {
        let selectedDay = days[indexPath.item]
        guard !selectedDay.isEmpty else { return } // 空白セルを無視

        presentFormView(for: selectedDay)
    }

    private func presentFormView(for day: String) {
        print(day)
    }
}
ポイント
- 月のラベルを表示 - 現在の年月をヘッダーに表示します。
- セル配置 - セルごとに曜日や日付を並べ、視覚的にカレンダーを作成します。
- 今日の日付をハイライト - 現在の日付を背景色で強調することで、ユーザーに分かりやすく表示します。
カスタムセルの設定
各日付を表示するためのCustomCalendarCellクラスを定義します。このクラスで日付の表示やハイライト処理を行います。
import UIKit

class CustomCalendarCell: UICollectionViewCell {
    static let identifier = "CustomCalendarCell"

    private let dayLabel: UILabel = {
        let label = UILabel()
        label.translatesAutoresizingMaskIntoConstraints = false
        label.textAlignment = .center
        label.font = UIFont.systemFont(ofSize: 14, weight: .medium)
        return label
    }()

    override init(frame: CGRect) {
        super.init(frame: frame)
        contentView.addSubview(dayLabel)

        NSLayoutConstraint.activate([
            dayLabel.topAnchor.constraint(equalTo: contentView.topAnchor, constant: 5), // 上に余白を設定
            dayLabel.leadingAnchor.constraint(equalTo: contentView.leadingAnchor, constant: 5),
            dayLabel.trailingAnchor.constraint(equalTo: contentView.trailingAnchor, constant: -5),
            dayLabel.heightAnchor.constraint(equalToConstant: 20) // 高さを固定
        ])

        contentView.layer.cornerRadius = 10
        contentView.layer.masksToBounds = true
    }

    required init?(coder: NSCoder) {
        fatalError("init(coder:) has not been implemented")
    }

    func configure(day: String, isToday: Bool = false, textColor: UIColor = .black) {
        dayLabel.text = day
        dayLabel.textColor = textColor
        contentView.backgroundColor = isToday ? .systemYellow : .clear
    }
}
今日の日付をハイライトする仕組み
UICollectionViewDataSourceのcellForItemAtメソッドで、現在の日付かどうかを判定し、セルの背景色を変更しています。
extension CalendarMonthViewController: UICollectionViewDataSource {
    func collectionView(_ collectionView: UICollectionView, numberOfItemsInSection section: Int) -> Int {
        return days.count
    }

    func collectionView(_ collectionView: UICollectionView, cellForItemAt indexPath: IndexPath) -> UICollectionViewCell {
        guard let cell = collectionView.dequeueReusableCell(withReuseIdentifier: CustomCalendarCell.identifier, for: indexPath) as? CustomCalendarCell else {
            return UICollectionViewCell()
        }

        let day = days[indexPath.item]
        let isToday = isToday(dateString: day)
        let column = indexPath.item % 7 // 曜日を判定(0: 日曜日, 6: 土曜日)

        var textColor: UIColor = .black
        if column == 0 { // 日曜日
            textColor = .red
        } else if column == 6 { // 土曜日
            textColor = .gray
        }

        cell.configure(day: day, isToday: isToday, textColor: textColor)
        return cell
    }

    private func isToday(dateString: String) -> Bool {
        guard let day = Int(dateString) else { return false }

        let todayComponents = calendar.dateComponents([.year, .month, .day], from: Date())
        let currentComponents = calendar.dateComponents([.year, .month], from: currentMonth)

        return todayComponents.year == currentComponents.year &&
               todayComponents.month == currentComponents.month &&
               todayComponents.day == day
    }
}
前月・次月をスムーズに切り替える
UIPageViewControllerの利用
カレンダーの前月・次月を横スクロールで切り替えるために、UIPageViewControllerを使用します。
import UIKit

class CalendarPageViewController: UIViewController {
    private let calendar = Calendar.current
    private var currentMonth: Date = Date()
    private var pageViewController: UIPageViewController!

    override func viewDidLoad() {
        super.viewDidLoad()
        view.backgroundColor = .white
        setupPageViewController()
    }

    private func setupPageViewController() {
        // UIPageViewControllerを初期化
        pageViewController = UIPageViewController(transitionStyle: .scroll, navigationOrientation: .horizontal, options: nil)
        pageViewController.dataSource = self
        pageViewController.delegate = self

        // 初期ページを設定
        let initialVC = CalendarMonthViewController()
        initialVC.setMonth(date: currentMonth)
        pageViewController.setViewControllers([initialVC], direction: .forward, animated: false, completion: nil)

        // ページビューを親ビューに追加
        addChild(pageViewController)
        view.addSubview(pageViewController.view)
        pageViewController.didMove(toParent: self)

        // レイアウト設定
        pageViewController.view.translatesAutoresizingMaskIntoConstraints = false
        NSLayoutConstraint.activate([
            pageViewController.view.topAnchor.constraint(equalTo: view.safeAreaLayoutGuide.topAnchor, constant: 0),
            pageViewController.view.leadingAnchor.constraint(equalTo: view.leadingAnchor),
            pageViewController.view.trailingAnchor.constraint(equalTo: view.trailingAnchor),
            pageViewController.view.bottomAnchor.constraint(equalTo: view.bottomAnchor)
        ])
    }

}

extension CalendarPageViewController: UIPageViewControllerDataSource {
    func pageViewController(_ pageViewController: UIPageViewController, viewControllerBefore viewController: UIViewController) -> UIViewController? {
        guard let currentVC = viewController as? CalendarMonthViewController else { return nil }
        guard let previousMonth = calendar.date(byAdding: .month, value: -1, to: currentVC.currentMonth) else { return nil }

        let previousVC = CalendarMonthViewController()
        previousVC.setMonth(date: previousMonth)
        return previousVC
    }

    func pageViewController(_ pageViewController: UIPageViewController, viewControllerAfter viewController: UIViewController) -> UIViewController? {
        guard let currentVC = viewController as? CalendarMonthViewController else { return nil }
        guard let nextMonth = calendar.date(byAdding: .month, value: 1, to: currentVC.currentMonth) else { return nil }

        let nextVC = CalendarMonthViewController()
        nextVC.setMonth(date: nextMonth)
        return nextVC
    }
}

extension CalendarPageViewController: UIPageViewControllerDelegate {
    func pageViewController(_ pageViewController: UIPageViewController, didFinishAnimating finished: Bool, previousViewControllers: [UIViewController], transitionCompleted completed: Bool) {
        if completed, let currentVC = pageViewController.viewControllers?.first as? CalendarMonthViewController {
            self.currentMonth = currentVC.currentMonth
        }
    }
}
ここで重要なのは、UIPageViewControllerを親ビューに追加し、現在の月のカレンダーを表示させることです。
StoryBoardを使わずコードでUIを生成
最後に、アプリ全体の初期設定をSceneDelegateで行い、コードのみでUIを生成します。
class SceneDelegate: UIResponder, UIWindowSceneDelegate {

    var window: UIWindow?

    func scene(_ scene: UIScene, willConnectTo session: UISceneSession, options connectionOptions: UIScene.ConnectionOptions) {
        guard let windowScene = (scene as? UIWindowScene) else { return }

        let window = UIWindow(windowScene: windowScene)
        let rootViewController = CalendarPageViewController()
        window.rootViewController = rootViewController
        self.window = window
        window.makeKeyAndVisible()
    }
StoryBoardを使わないことで、柔軟なレイアウト変更や動作確認が可能です。
まとめ
この記事では、断酒カレンダーアプリの基本構造を説明しました。以下のステップを進めることで、機能的なカレンダーアプリを構築できます。 UICollectionViewでカレンダーを作成 現在の日付をハイライト表示 UIPageViewControllerで月の切り替えを実装
断酒を続けるために役立つアプリを一緒に作っていきましょう。次回は、記録機能や通知機能の実装について紹介します!
ダウンロード
このブログ記事で使用しているコードはGitHubで公開していますので、気軽にダウンロードしてご活用ください。
今回のサンプルカレンダーは、CalenderSampleAppターゲットをビルドすると再現できます。


