【断酒iOSアプリ制作】感情・日記の入力画面をつくる (7日目)
断酒してから7日目が経ちました。1週間の断酒に成功です!自分を褒めたいです。いや、むしろ毎日褒めています。
体調もマインドもすこぶる快調で、日々の充実感がまるで別物です。「お酒は本当に必要ないんだな」と心から思えるようになってきました。
飲酒していた頃は、夜中に喉が渇いて途中で目が覚めたり、睡眠の質が悪くて長時間寝てしまうことがよくありました。特に週末になると、仕事から解放された反動でたくさん飲んでしまい、せっかくの休日を二日酔いで無駄にしていました。振り返ると、人生の時間をかなり無駄にしていた気がします。
若い頃ならまだ時間や体力に余裕がありましたが、年齢を重ねるにつれて「このままで良いのか」と焦りを感じるようになりました。そんな中、断酒に挑戦しているわけですが、昨日はなんと山登りに行ってきました!以前からぼんやりと「やりたいな」と思っていたことの一つです。高尾山に行ってきたのですが、誰でも登れる山とはいえ、自然と触れ合えて大満足でした。その様子を動画に収めたので、ぜひご覧ください。
山にはたくさんの人がいましたが、それでも自然と触れ合うことで心が癒されました。「これが私のやりたかったことなんだ」と実感できました。これからの人生、もっと自然と触れ合っていきたいと強く思いました。この気持ちになれたのも、断酒を続けているおかげです。ありがとうございます!
感情・日記の入力画面を作る
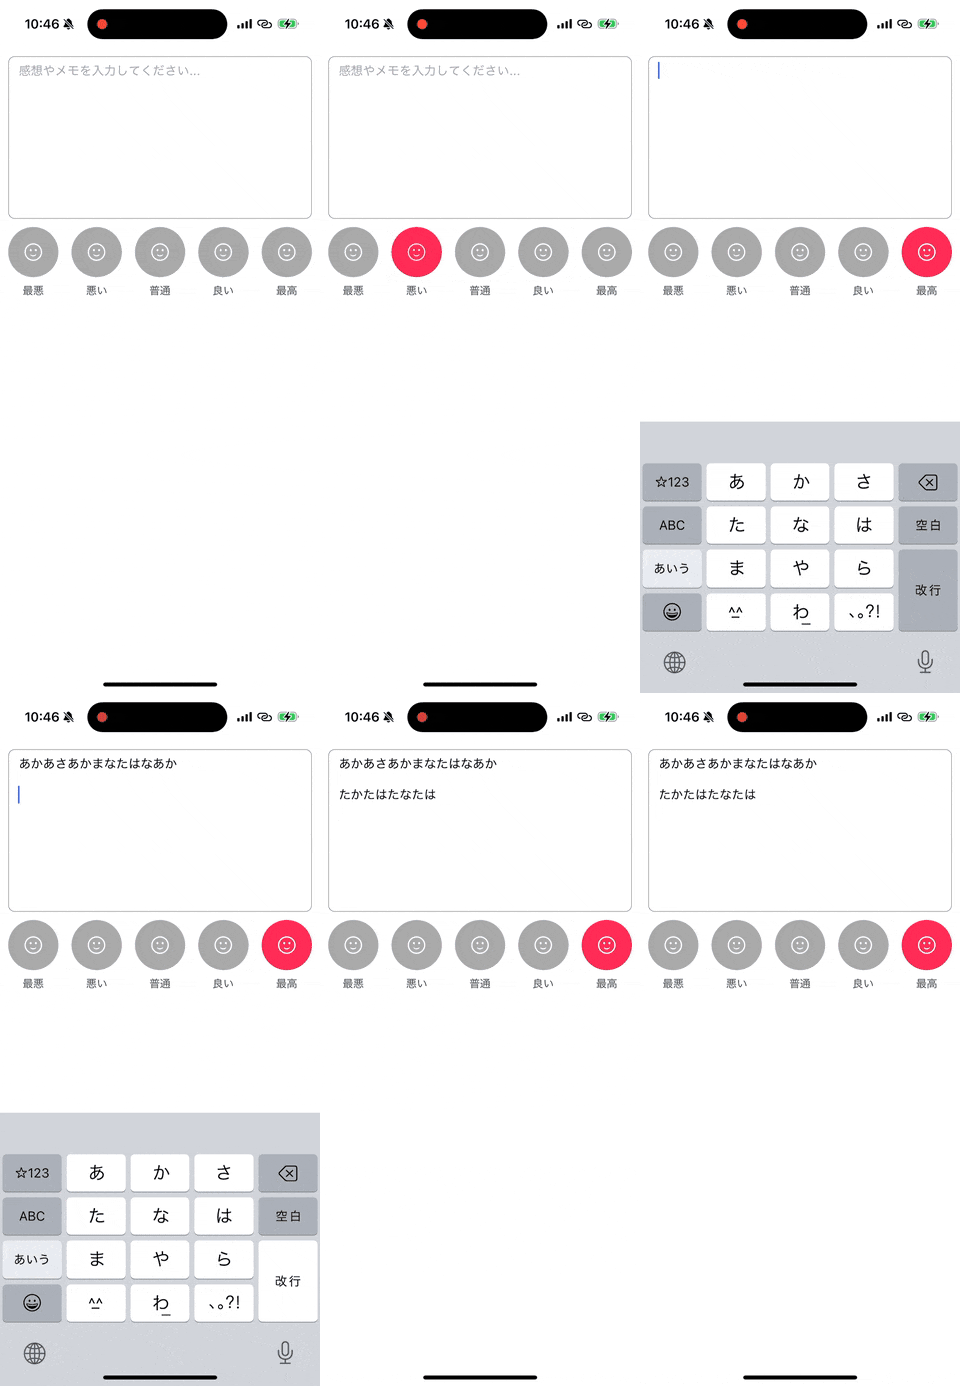
前置きが長くなりましたが、今回は感情や日記を記録する入力画面のUIを作ってみます。断酒の日々の思いを記録することは、自己成長に繋がると考えています。その日その日の達成感を味わえますし、記録を積み重ねることで自信にもなります。また、万が一飲酒してしまった場合でも、過去の記録を見返すことで「あの時の気持ちをもう一度味わいたい」と思い、断酒を再開するきっかけになるはずです。
そんな理由から、この機能をアプリに実装しようと考えました。次の動画のような動きを作っていきます。
感情を5段階評価する enum の準備
感情を選択するために、5段階の評価を表現できる enum を用意します。各ケースには適切なラベルを設定しており、UIで簡単に使える形にしています。
enum EmotionLevel: Int, CaseIterable {
    case notSelected = 0 // 未選択
    case worst = 1       // 最悪
    case bad = 2         // 悪い
    case neutral = 3     // 普通
    case good = 4        // 良い
    case best = 5        // 最高

    // ラベルを定義
    var label: String {
        switch self {
        case .notSelected: return "未選択"
        case .worst: return "最悪"
        case .bad: return "悪い"
        case .neutral: return "普通"
        case .good: return "良い"
        case .best: return "最高"
        }
    }
}
この enum を利用することで、感情の状態をコード内で簡潔かつ安全に扱えます。
丸ボタン
感情の選択を視覚的に行えるよう、丸いボタンを作成します。 UIView を継承したカスタムクラス CircleButtonView を用いて、ボタンとラベルをセットで表示します。
import UIKit

class CircleButtonView: UIView {

    private let button: UIButton = UIButton(type: .system)
    private let label: UILabel = UILabel()

    // ボタンがタップされたときのコールバック
    var onTap: (() -> Void)?

    // 初期化
    init(icon: UIImage?, labelText: String) {
        super.init(frame: .zero)

        // ボタンの設定
        button.setImage(icon, for: .normal)
        button.tintColor = .white
        button.backgroundColor = .lightGray
        button.layer.masksToBounds = true
        button.translatesAutoresizingMaskIntoConstraints = false
        button.addTarget(self, action: #selector(buttonTapped), for: .touchUpInside)

        // ラベルの設定
        label.text = labelText
        label.font = UIFont.systemFont(ofSize: 14)
        label.textColor = .darkGray
        label.textAlignment = .center
        label.translatesAutoresizingMaskIntoConstraints = false

        // サブビューを追加
        addSubview(button)
        addSubview(label)

        // レイアウトを設定
        NSLayoutConstraint.activate([
            button.widthAnchor.constraint(equalTo: self.widthAnchor), // 親ビューの幅にフィット
            button.heightAnchor.constraint(equalTo: button.widthAnchor), // 正方形にする
            button.centerXAnchor.constraint(equalTo: self.centerXAnchor),
            button.topAnchor.constraint(equalTo: self.topAnchor),

            label.topAnchor.constraint(equalTo: button.bottomAnchor, constant: 8),
            label.centerXAnchor.constraint(equalTo: self.centerXAnchor),
            label.bottomAnchor.constraint(equalTo: self.bottomAnchor)
        ])
    }

    @objc private func buttonTapped() {
        onTap?() // コールバックを実行
    }

    override func layoutSubviews() {
        super.layoutSubviews()
        button.layer.cornerRadius = button.bounds.width / 2 // ボタンを円形にする
    }

    // ボタンの背景色を変更するメソッド
    func updateButtonBackgroundColor(_ color: UIColor) {
        button.backgroundColor = color
    }

    required init?(coder: NSCoder) {
        fatalError("init(coder:) has not been implemented")
    }
}
UI全体の構築
感情選択ボタンとテキスト入力フィールドを組み合わせた画面を構築します。 ViewController 内で感情を選択するロジックや、メモ入力用の UITextView をセットアップします。
感情選択ボタンのセットアップ
感情の選択は丸ボタンを並べたスタックビューで表現します。選択状態に応じてボタンの背景色が変わる仕組みを実装しています。
import UIKit

class ViewController: UIViewController {

    private var selectedEmotion: EmotionLevel = .notSelected {
        didSet {
            updateButtonStates()
        }
    }

    private var circleButtonViews: [CircleButtonView] = []
    private var textView: UITextView!

    override func viewDidLoad() {
        super.viewDidLoad()
        setupTextView()
        setupEmotionButtons()
        setupDismissKeyboardGesture()

    }

    private func setupTextView() {
        textView = UITextView()
        textView.translatesAutoresizingMaskIntoConstraints = false
        textView.layer.borderWidth = 1
        textView.layer.borderColor = UIColor.lightGray.cgColor
        textView.layer.cornerRadius = 8
        textView.font = UIFont.systemFont(ofSize: 16)
        textView.textContainerInset = UIEdgeInsets(top: 8, left: 8, bottom: 8, right: 8)
        textView.isScrollEnabled = true
        textView.text = "感想やメモを入力してください..."
        textView.textColor = .lightGray

        // プレースホルダーのような動作を実現
        textView.delegate = self

        view.addSubview(textView)

        NSLayoutConstraint.activate([
            textView.leadingAnchor.constraint(equalTo: view.leadingAnchor, constant: 10),
            textView.trailingAnchor.constraint(equalTo: view.trailingAnchor, constant: -10),
            textView.topAnchor.constraint(equalTo: view.safeAreaLayoutGuide.topAnchor, constant: 10),
            textView.heightAnchor.constraint(equalToConstant: 200) // 高さを固定
        ])
    }

    private func setupEmotionButtons() {
        let emotions = EmotionLevel.allCases.filter { $0 != .notSelected }

        // スタックビューで配置
        let stackView = UIStackView()
        stackView.axis = .horizontal
        stackView.alignment = .center
        stackView.distribution = .fillEqually
        stackView.spacing = 16
        stackView.translatesAutoresizingMaskIntoConstraints = false
        view.addSubview(stackView)

        NSLayoutConstraint.activate([
            stackView.topAnchor.constraint(equalTo: textView.bottomAnchor, constant: 10),
            stackView.centerXAnchor.constraint(equalTo: view.centerXAnchor),
            stackView.leadingAnchor.constraint(equalTo: view.leadingAnchor, constant: 10),
            stackView.trailingAnchor.constraint(equalTo: view.trailingAnchor, constant: -10)
        ])

        for emotion in emotions {
            let icon = UIImage(systemName: "face.smiling") // 任意のアイコン
            let circleButtonView = CircleButtonView(icon: icon, labelText: emotion.label)

            circleButtonView.onTap = { [weak self] in
                self?.selectedEmotion = emotion
            }

            stackView.addArrangedSubview(circleButtonView)
            circleButtonViews.append(circleButtonView)
        }

        updateButtonStates()
    }

    private func updateButtonStates() {
        for (index, buttonView) in circleButtonViews.enumerated() {
            let emotion = EmotionLevel(rawValue: index + 1) // `notSelected`を除外した分ずらす
            let isSelected = emotion == selectedEmotion
            buttonView.updateButtonBackgroundColor(isSelected ? .systemPink : .lightGray) // ボタンの背景色を更新
        }
    }

    private func setupDismissKeyboardGesture() {
        let tapGesture = UITapGestureRecognizer(target: self, action: #selector(dismissKeyboard))
        view.addGestureRecognizer(tapGesture)
    }

    @objc private func dismissKeyboard() {
        view.endEditing(true) // キーボードを閉じる
    }
}
キーボードを閉じるジェスチャーの設定について
iOSアプリでは、UITextView や UITextField に文字を入力した後、画面のどこかをタップしてキーボードを閉じたいというケースがよくあります。しかし、デフォルトではタップしてもキーボードが閉じないため、明示的にその処理を実装する必要があります。
setupDismissKeyboardGesture メソッドで、UITapGestureRecognizer を使ってタップを検知するジェスチャーを作成し、画面全体 (view) に追加しています。これでタップジェスチャーを利用してキーボードを閉じる仕組みが実現できます。view.addGestureRecognizer(tapGesture) のジェスチャーをビューに追加することで、タップイベントを検知できるようにしています。タップジェスチャーによって呼び出される dismissKeyboard メソッドの中では、view.endEditing(true) を使用して現在のファーストレスポンダー(=入力中の UITextView や UITextField)の編集状態を終了します。これにより、キーボードが非表示になります。true を指定すると、すべてのファーストレスポンダーを終了対象とします。コードを試してみる
この記事で使用したコードは以下のGitHubリポジトリで公開しています。ぜひご活用ください。 GitHub - aragig/ios_sample_dansyu: 断酒カレンダーアプリ制作で使う、部品サンプルです
今回のサンプルアプリは、EmotionFormSampleAppターゲットをビルドすると再現できます。
まとめ
この記事では、断酒アプリの感情・日記の記録画面を作成しました。感情を視覚的に選択できるUIとメモ入力機能を組み合わせることで、断酒の成果を記録しやすくしています。この記録が、モチベーションを維持し、より豊かな生活を送るきっかけになれば幸いです。
次回はデータを永続化する方法について解説します!


